The web has been buzzing lately about the new L Letterpress Tool by Lifestyle Crafts, a division of QuicKutz, best known for their die-cutting tools. I have to admit that I was rather dubious about this new tool. Could what amounts to a piece of plastic really come close to duplicating the effect created by an antique press? However, my curiosity was piqued, and when I saw that Paper Source, who will be carrying the L Letterpress in their stores, was offering demonstrations this weekend I had to go and check it out.
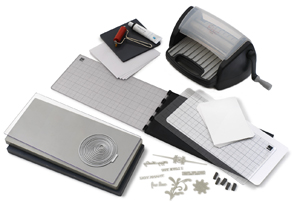
I watched a demo video of the tool before I went to the in-person demonstration, so I had a good idea about how it worked. The tool comes with two main pieces, a heavy plastic hinged piece that serves as a place to layout your design using printing plates — the “plates” look a lot like unmounted acrylic stamps, though I forgot to ask whether acrylic stamps would work in the tool (they may be too thick to properly work) — and to position your paper in preparation for printing. You use special oil based letterpress ink and a brayer, which comes with the L Letterpress kit, to apply ink to your prepared design. After the design has been inked, you fold the hinged piece until the inked plates are in place over the paper, and you run the whole piece through the second part of the tool — QuicKutz’s Epic Six tool, originally one of their die cutting products — which actually does the “letterpressing”. If you’re interested in seeing a demo in action, you can watch this video:
What I was most curious about was what sort of impression this tool made on the paper. I couldn’t really tell in the video I’d watched or any of the pictures that I’d seen of sample products made by the L Letterpress. I was actually pleasantly surprised by the result. It seems to take a bit of practice to get the amount of ink right, but when you do you get a nice inked impression that does look quite like a piece made with an actual letterpress. In the demonstration that I saw, regular cardstock was used, but the woman doing the demonstration mentioned that you could get an even better impression if you used a thicker, cotton based paper like many real letterpress shops use. I wish that I could’ve gotten a sample card or something to bring home with me to photograph, but because the ink used is oil based, it hadn’t dried in time for me to get something.

Now, do I think that the L Letterpress tool is going to replace the antique letterpress? Of course not. But this tool has made me ask myself a rather philosophical question: what is letterpress? Is letterpress merely the technique of creating an inked, debossed image on paper, or is it much more than that? I have to admit that there’s something very romantic to me about finding that rare treasure, an antique press, and pouring your efforts into getting it into working condition so you can create beautiful cards, invitations, posters, and other wonderful letterpress goods. But the fact is that a real letterpress isn’t a practical choice for most of us.
The L Letterpress Tool allows those of us who are interested in letterpress technique but who may not have the room to house a 1,000+ lb. machine, the desire to go on what may be a fruitless expedition in search of the increasingly hard to find presses, the money to invest in parts to get the press in working condition again, or the time to do most of the above to actually give it a shot in the comfort of our own homes.
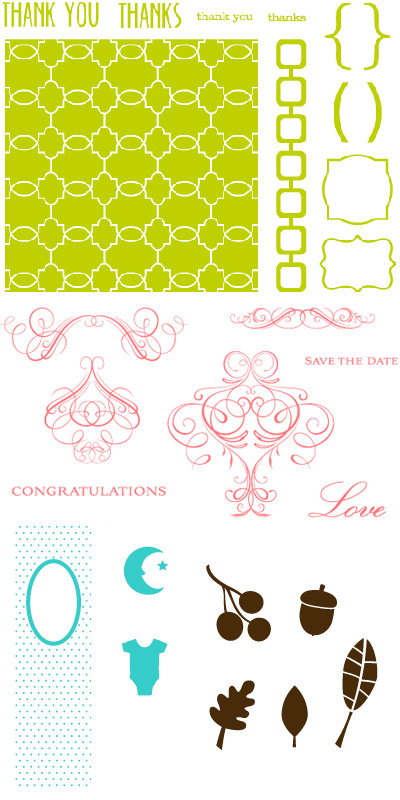
While the tool does make letterpress more accessible to hobbyists and crafters, I also see some limitations with it in its current state. My main concern is flexibility. As of now, Lifestyle Crafts has released several sets of plates for the L Letterpress (examples shown above), and while they’re perfectly nice, variety is limited. I could see myself experimenting with their plates, but after I got the hang of things I know I’d be looking to create my own custom work, and as of now that option isn’t offered. I did ask my Paper Source demonstrator about using photopolymer plates like those used in real letterpress, and she told me that she thought that those would work perfectly fine in the tool. While that has me very excited, I need confirmation that this will work before I make the investment. I’m planning on contacting shops that I know make the photopolymer plates to see if they might be able to confirm that their plates can be used in this machine, and I’ll update you here when I have more information.
Update: I caved and bought an L Letterpress, and thanks to Diane’s tip in the comments about the A.C. Moore coupon, I saved 50%. Pretty great deal! Now that I have the tool, I will be able to test photopolymer plates and will share my results as soon as I have them.
Update #2: I’ve posted my results with the standard plates for the L, as well as preliminary custom photopolymer plate results.
The other main drawback to the L Letterpress, for me, at least, is another that involves lack of flexibility. If you want to create normal sized cards and similar items, then it’s the perfect size, but if you want to expand into larger cards and invitations, or posters and other goods, then the dimensions of this tool are going to be much too small. While this isn’t too big a deal, you’ll want to consider the types of things that you want to make before purchasing the tool.
I did learn a couple of tips about the L Letterpress, thanks to my Paper Source demonstrator, and these might help you if you plan on purchasing. Instead of using the double sided adhesive that you can purchase to adhere the plates to the surface in preparation for printing, used double-sided tape instead. It will save you both money and time. Also, after you attach the tape or adhesive to the plate, instead of trying to guess where you need to place the plate on the hinged lid in order to get the perfect placement on your card, turn the un-inked plate face down on the paper where you want it to be printed, and bring the hinged lid around, pressing down on the adhesive backed plate to make it stick. Ta-da, perfect placement!
As a side note, I learned that the L Letterpress can also serve as a die cutting tool, which makes sense given that the part that does the pressing was originally (and is still) used for creating die cuts. The kit comes with a set of circular dies, but I was told that the dies leave marks on the plastic lid of the tool, and the Paper Source demonstrator told me that they weren’t using the dies until they could figure out how do create die cuts without damaging the plastic lid. Something to think about before you use the tool for die cutting!
In conclusion, I have to say that I like the L Letterpress Tool more than I thought that I would. Letterpress purists may think that it’s the devil, and I can certainly understand where they’re coming from. I’m no purist, but I do love letterpress, and part of that love is about the effort and process involved in setting up an antique letterpress. If someone is a letterpress printer, then you know that they love what they do, and I think that comes through in what they create. I’d actually say that seeing the new tool in action gave me an even deeper appreciation for what letterpress printers do. Will I be purchasing the L Letterpress Tool? If you can, indeed, use custom photopolymer plates in it, then you bet! But I’ll also continue to add to my collection of letterpress lovelies created by my favorite studios. In fact, I picked up a couple of new cards after the Paper Source demo. I can’t step foot in that place without spending at least $50, and I know that won’t change!
Psst … if you want a chance to win an L Letterpress Kit, then check out iDiY! They’re giving away one of the kits, and you can enter to win until November 18, 2009.
images from Lifestyle Crafts