Want even MORE Halloween freebies? Check these out!
Materials needed for this project:
Garland Templates or Silhouettes (links below)
A Printer
Cardstock
Scissors
Xacto Knife (optional)
A Needle and Thread
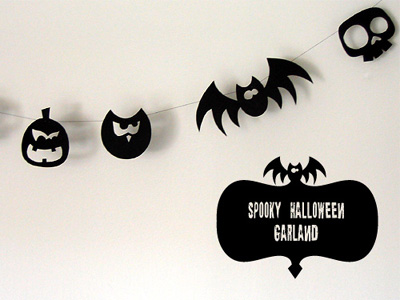
Thoughts of creating a Halloween garland were swirling in my mind for months, and this is the result of my experimentation. The garland is made of four spooky cute illustrations, and the one pictured was created the first way, which involves cutting templates, tracing them onto black cardstock, and cutting the shapes out with scissors and an Xacto.
However, I got to thinking that not everyone may have the time to make the garland this way, as it is somewhat more time intensive. I also thought that it may be more difficult for young children to take part in cutting out the shapes if you made the garland using templates. With these things in mind, I made a second version of the garland. Just print the silhouettes onto cardstock or heavy paper and cut on the dotted lines. Thread the shapes onto your choice of hanging material, and you’re good to go!
These spooky silhouettes can also be used as gift tags or hang tags, treat bag decorations or, if you have a white or metallic paint pen, you can make them into name tags.
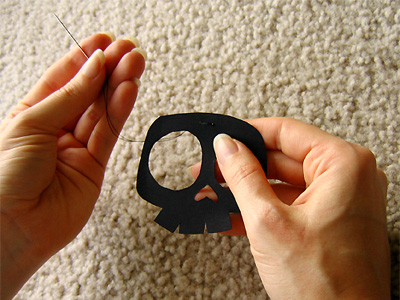
This is a shot of the threading process. I used black sewing thread and a needle and sewed up through the right side of the shape, sewing a second hole down through the left of the shape, and coming out the left side. This allowed me to slide the shapes over to the right as I threaded them onto the garland. The two hole “technique” allows for easy re-positioning, but it holds the shapes in place nicely, too. After all of the shapes are threaded, hang your garland on a wall or wherever, and enjoy!
Download the outlines here: Halloween Garland Template Outlines (PDF 16Kb)
Download the silhouettes here: Halloween Garland Silhouette Cutouts (PDF 15Kb)
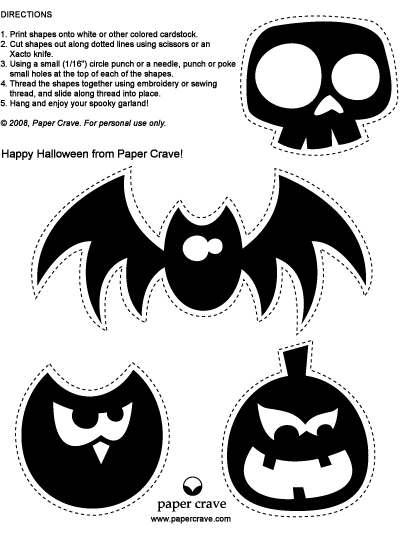
Preview of the silhouettes, shown at about 60% of their original size.
images from Paper Crave


